
Increase depth of field with focus stacking
Have you ever seen those commercial shots where everything is perfectly sharp, even if the shot is very close up? That kind of photo you can't get by just snapping. We need a special technique called focus stacking.
To increase depth of field, just stop down. However, there are limits beyond which you cannot go (I'll explain them later).
With the focus stacking technique you can get the whole scene in focus , without having to close the aperture too much.
Why can not you close the aperture too?
You've learned that if you want to increase depth of field, you have to stop down very much. If you go to very small aperture values, f/11, f/16 and beyond, the whole scene looks sharp.
It seems, indeed. Because in reality the focus is always on one plane, while the perception that the rest of the image is in focus increases. This perception is sometimes enough, sometimes not.
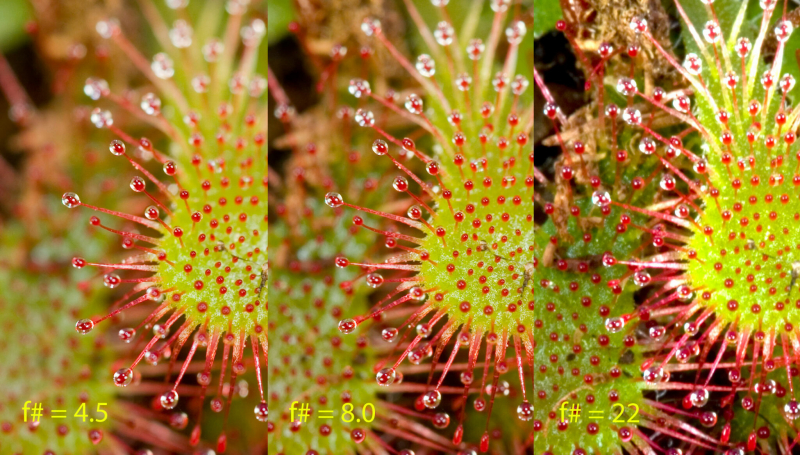
The more you close the diaphragm, the more this perception increases. However, there are practical limits. For values of f/22 or f/32 you will mainly face two problems:
- little light will enter the lens (therefore underexposure)
- you will encounter the phenomenon of diffraction.
The first problem is understandable: the more you close the aperture, the less light enters. Consequently, to have an optimal exposure, you will be forced to act on the times or on the ISO.
If you set the times too slow, you risk blur. For a scene with standard motion, such as people walking, it is very risky to go below 1/100th of a second.
On the other hand you can't shoot the ISOs at very high levels. Even the best cameras above ISO 3200 begin to produce digital noise. So you will suffer in quality.
Diffraction is a lesser known physical phenomenon. Usually you don't have to deal with this problem, because in normal situations you hardly shoot at f/22 or f/32.
Diffraction occurs when light is forced through extremely small holes. Just like a very closed diaphragm.
The consequences are serious. You will experience a decay of image detail and the appearance of a strange glow around the brightest parts.
What is the focus stacking technique for?
Focus stacking is used to obtain a sharp image both from near and far, avoiding the underexposure and diffraction typical of a too small aperture.
Thanks to this technique you can get a really sharp image , from a few centimeters up to kilometers in landscape photography.
In macro photography , very close distances to the subject result in a narrowing of the depth of field. In this photographic genre it may not be enough for you to even close the aperture very much.

Thanks to focus stacking you can get around this problem. This technique is used to produce most of the advertising photographs that point to the detail of the entire product.
How to do focus stacking
Now that you understand what focus stacking is and when you need it, it's time to take action. In this paragraph I will explain:
- how to set up the camera
- Why use a tripod
- how to make the various shots
- how to merge shots in post production.
Once you've chosen your subject, you'll need to take multiple photos by focusing at different focal planes. There is no ideal number of shots.
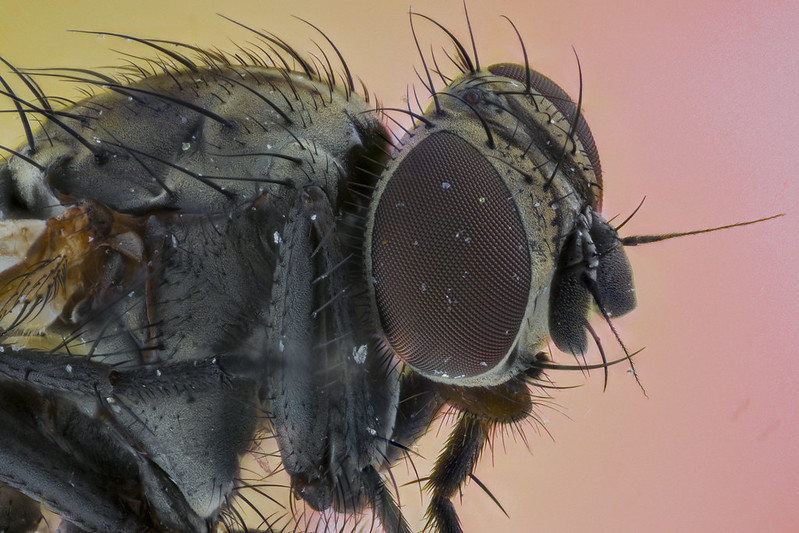
In general, you have to try to cover the entire extension of the image, focusing successive portions of the image. These various portions (the shots), will then be merged in post-production. I'll be clearer with an example.

In this case, only two shots were taken. In the first shot the photographer tried to get an acceptable sharpness on the front of the fly (focusing on the head) In the second shot, he got the sharpness on its back (focusing on the tail).
As you can see (in the third photo), the result is more than good. With focus stacking he got the entire subject in focus, otherwise impossible to achieve with a single shot.
How to set up the camera
I explained to you how counterproductive it is to use too small apertures. Likewise, to take the various shots, you'll need to start from a sufficiently large depth of field. The smaller the aperture is closed, the fewer shots you will have to take.
Usually it is good to shoot between f/5.6 and f/8. If you have exposure problems, then you may want to open the aperture a little. In this case you will get a narrower depth of field.
This means that you will have to increase the number of shots (because the portion of the sharp image shrinks). In my test I shot at f/2 because I had little light available.
The tripod is essential in focus stacking
Before starting the series of shots, you need a tripod. This accessory is essential to avoid possible variations in the shot.
Having perfectly equal shots is essential in focus stacking. This facilitates the work of the post-production software when superimposing the photos.
Once you have the various shots, you will have to merge them in post-production. It is a delicate operation, which is successful only if the various photos are perfectly superimposable.
For this reason, in addition to the tripod, a remote shutter release can be very useful. This way you don't need to touch the shutter button of the camera. It's an operation that can inadvertently move the camera a few millimeters. This can have a dramatic effect on framing.
How to make the various shots
Once you have set the shooting parameters and positioned the camera in a stable manner, start shooting.
As I explained to you, the framing must never change, so you only have to act on the point of focus.
You can use manual or auto focus. The camera model also comes into play here. The more advanced ones have more focus points. Entry level models have fewer.
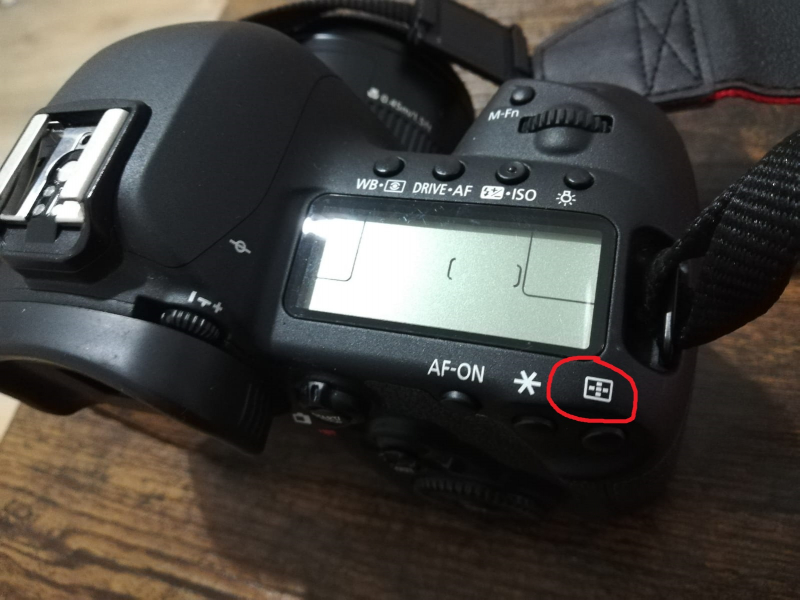
To change the focus points, you must first access the specific function through the camera menu. There is often a dedicated key, usually represented by 4 or 5 dots inside a circle or rectangle.
Once activated, you can move between points using the camera's directional key.
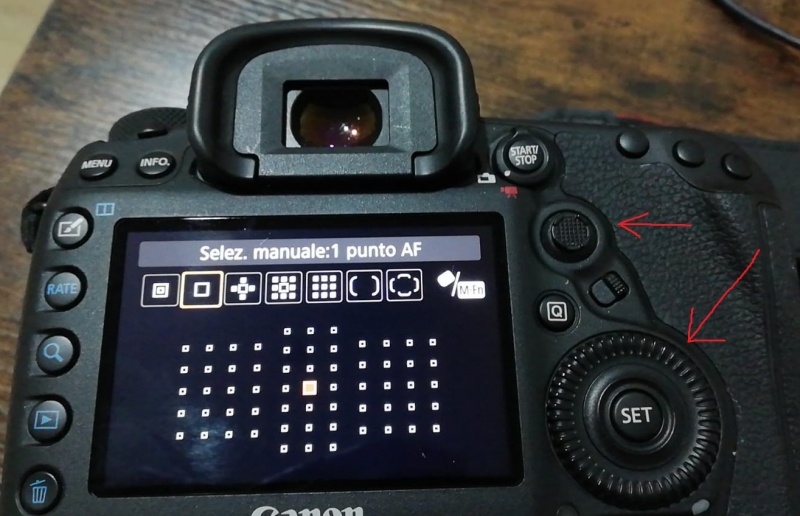
Also, newer cameras often have touch displays. This is a nice help in focus stacking. With the touch, in fact, you can touch the focus point on the display, without using the shutter button or the lens ring. The risks of camera shake are minimized.
Start by focusing on a plane closest to you, without worrying about the rest of the photo. Pay attention to how much of the scene is in focus, then move away focusing further and further away.
The number of shots will depend on the portion of a sharp image you get with each shot.
For my test I made 12 shots. The number of shots is quite high because I had an aperture open to f/2. With a smaller aperture, you may need fewer shots.
In the sequence, I have indicated all the various points of focus with a green dot.

If you don't have a camera with professional performance, I suggest you position the subject so that the focus points fall on the points of the subject you want to have in focus. Alternatively, use manual focus.
How to merge shots in post production
In this section, I'll explain how to get a single image, in which everything is sharp, by "merging" the various photos you've taken.
I show you how to get a professional result with Photoshop, but if you want to speed up the process, there are apps and utilities online that do a good job just the same. I'll make you a list later.
In the meantime, if you use Photoshop, I advise you to collect all your shots in a folder. It will be easier to recover them. The last phase of the work, therefore, is the fusion of the shots . Proceed like this.
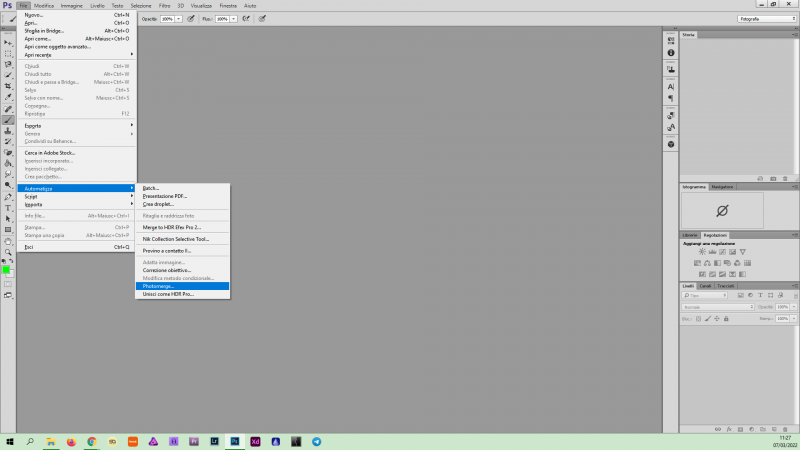
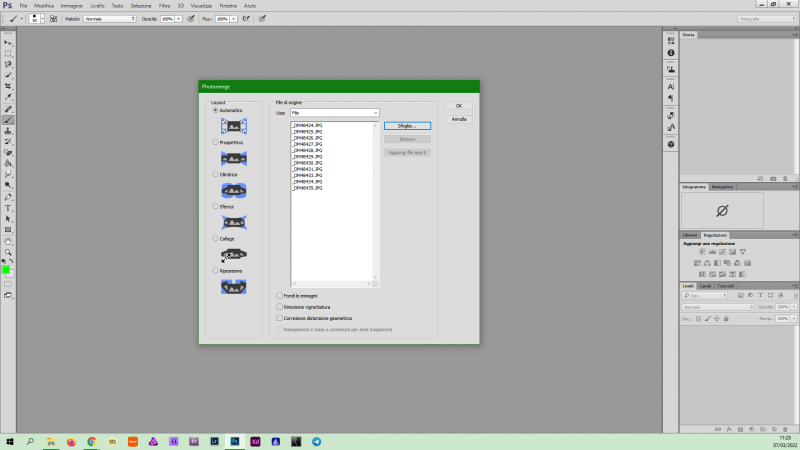
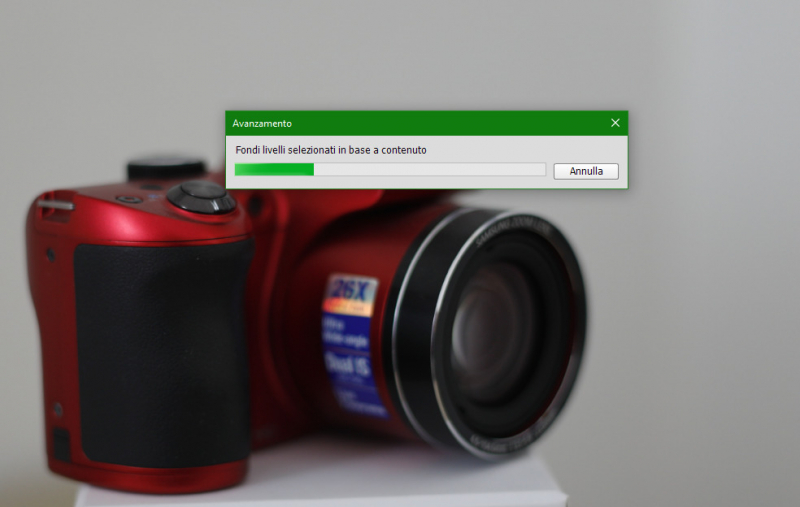
Go to File, Automate, Photomerge…
In the dialog that opens, choose "Automatic" and remove any check marks from the functions "Blending images", "Remove vignetting" and "Correct geometric distortion".
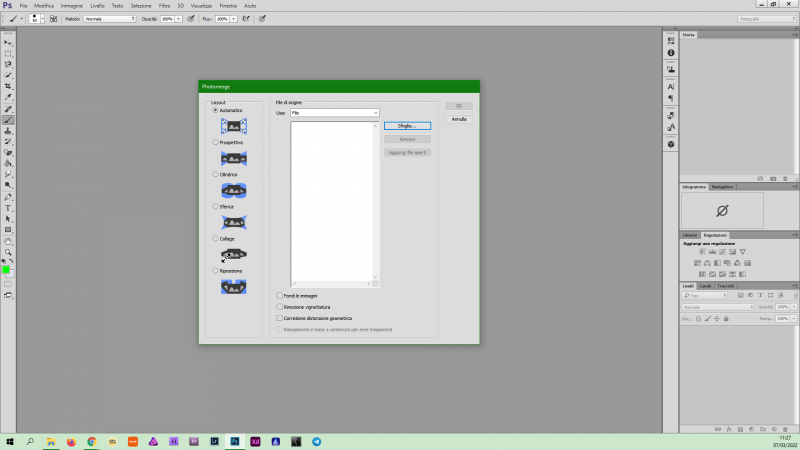
Then, from Browse… upload your photos.
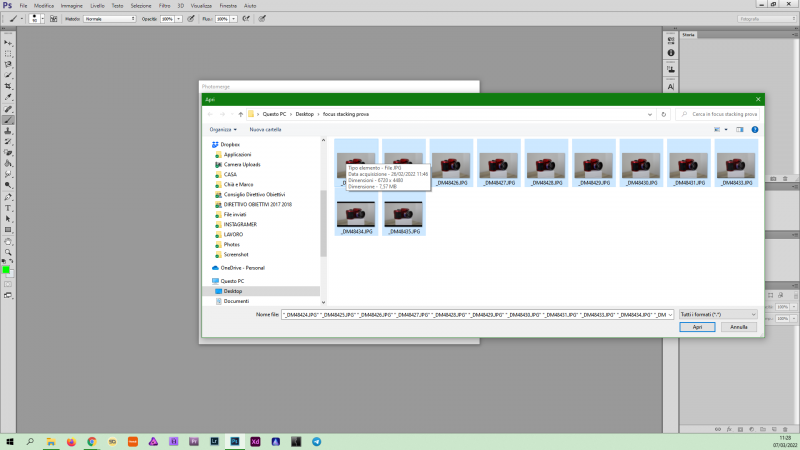
Once they appear in the dialogue box, press Ok and proceed.
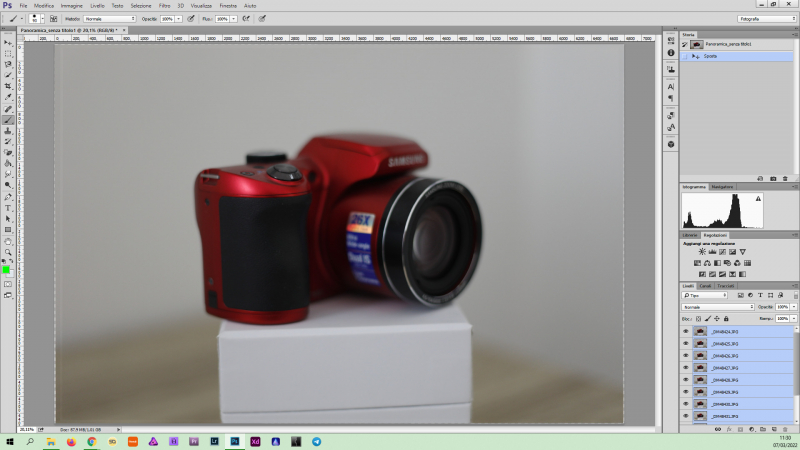
From now on Photoshop will load your photos and create the various layers. You will have to wait a few seconds for the operations to finish. The time taken will depend on the number of photos to upload and the speed of your computer. It may take a few seconds or even a couple of minutes.
When finished, this will be the situation.
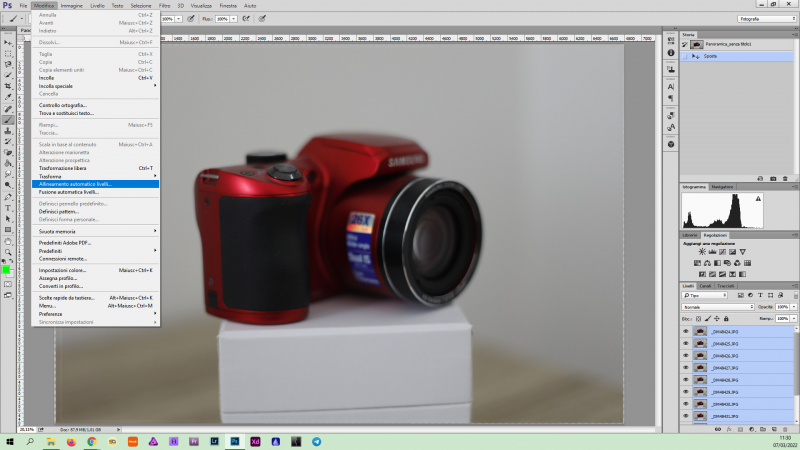
Now go to Edit and Auto Align Layers. This operation is used by Photoshop to correct any micro shifts in the frame during the shooting phase. The more precise the shots are, the more effective the result will be.
In the dialog box choose “Create image series” and check the “Solid color and tone” and “Content-aware fill for transparent areas” functions.
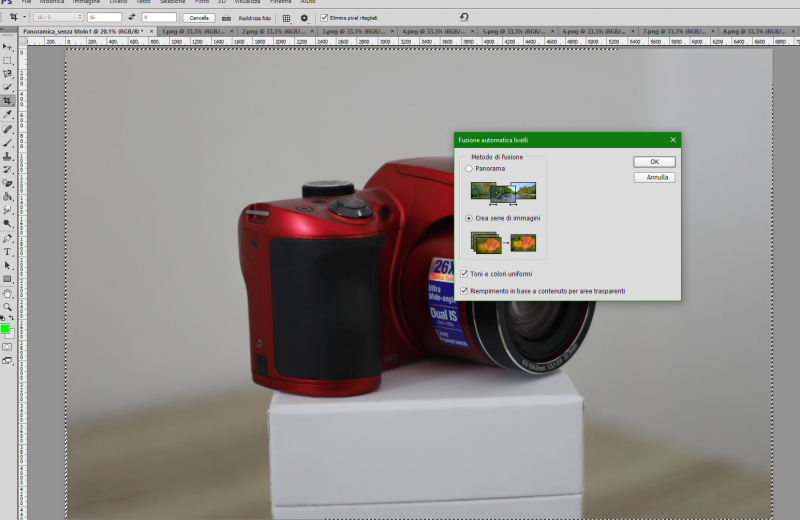
Again, leave enough time for the software to do all the work.
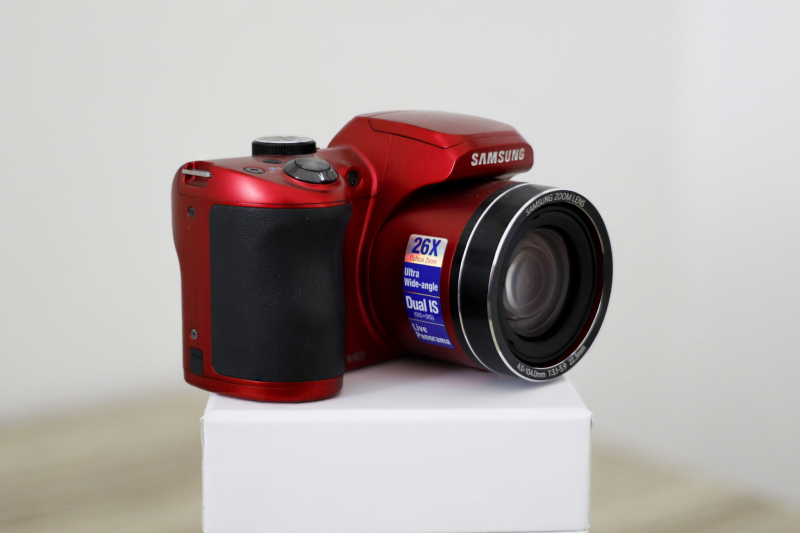
Once done, focus stacking will be completed. Photoshop will save you every single layer with all the operations done. From here you can eventually correct some overlap not perfectly done. In my case the result is this.
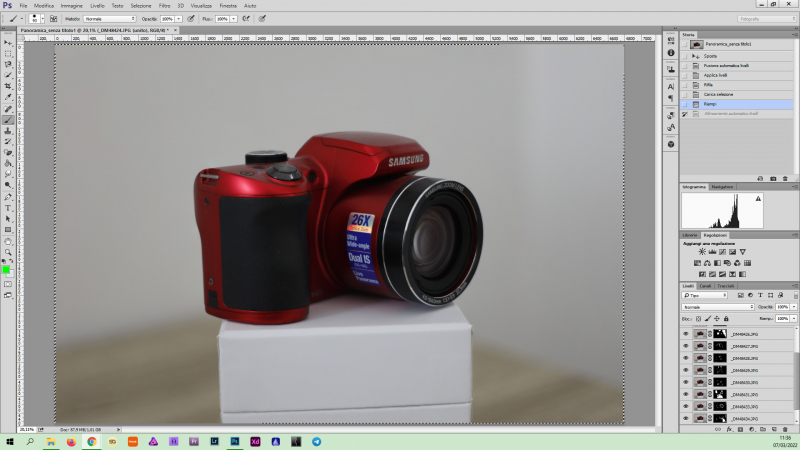
You just have to work on the image to improve it further. I worked on brightness, contrast and sharpness.
If you don't want to use Photoshop, there are some smartphone apps and online utilities that can do the trick. I'll point out some of them:
Focus stacking directly in the camera
Some camera models, the most recent and most advanced ones, allow you to carry out focus stacking directly in the camera.
Once you set up the "focus stacking" function, you take the various shots as usual. When finished, the camera software merges the shots and delivers the final image directly to you. A bit like HDR.
This automatism has an advantage and a disadvantage. The advantage, of course, is that of greatly speeding up the operations without having to go through a processing software.
The downside is that you have no control over the process. Therefore, any errors in the shooting phase (for example a small shift in the shot) cannot be resolved by acting on the levels.
Be that as it may, here is a partial list of cameras capable of in-camera focus stacking:
- Nikon Z7
- Nikon Z6II
- Nikon Z7II
- Nikon D850
- Nikon D780
- Nikon D6
- Canon EOS R5
- Canon EOS R6
- Canon EOSRP
- Canon EOS 90D
- Sony A7RIII
- Sony A7REV
- Fujifilm X-A3
- Fujifilm X-A10
- Fujifilm X-T20
- Fujifilm GFX 50s
When is it best to use focus stacking?
As I mentioned at the beginning of the article, focus stacking is mainly indicated in some specific photographic genres. For example:
- landscape
- macros
- commercial product photography
Generally, focus stacking finds great application in all situations where it is required to have the whole scene in focus.
Focus stacking and landscape
When shooting landscape photos, you usually just need to close the aperture very much to get almost the whole scene in focus.
This principle is valid in shots with a lot of light, where it is difficult to underexpose even with high aperture values.
However, if the light begins to lack, such as in the evening or even at sunset, then closing the aperture beyond certain values can be a problem.
Apart from that, if you want to avoid diffraction, you should never go beyond a small aperture of f/16. At these values, depth of field begins to narrow. Any foreground element will inevitably appear blurry. Focus stacking can work around this.
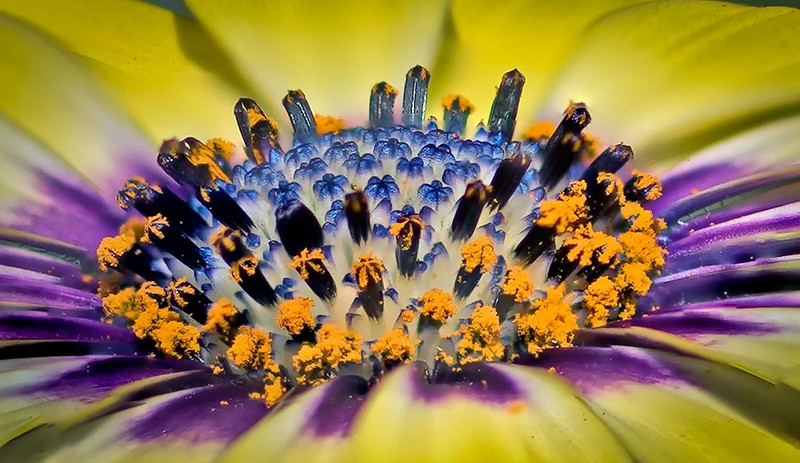
Focus stacking and macros
Macro photography is perhaps the best field of application for focus stacking. If you want to get a fully focused image on a very close subject, stopping down very far will not be enough.
If you know depth of field, you know that it increases if:
- close the diaphragm
- you walk away from the subject
- decrease the focal length of the lens
In macro photography, you are very close to the subject. Also, long focal length lenses are often used.
This combination of factors greatly restricts the depth of field , down to a few centimeters or even millimeters. If your intention is to have the whole scene in focus, you need to resort to focus stacking.
Focus stacking and commercial photography
When taking photos in a commercial setting, there is often a need to show off the product well. In this case the focus stacking technique becomes even indispensable.
The field of application is very broad. Any product can benefit from it, if you need to photograph it up close.
Conclusions
At first glance, the focus stacking technique may seem complex and cumbersome. In reality, it is sufficient to do a few tests to immediately obtain good results.
To accelerate learning, you can start right away to avoid some mistakes, which those approaching this technique usually make.
The fundamental rule is to take the shots trying to be as precise as possible in the shot. This is the key to success, otherwise the post-production software will struggle to superimpose the images perfectly. The result will be messy. Sometimes it will be almost impossible to get an acceptable result.
This means that a solid and quality tripod is mandatory. Many photographers underestimate the usefulness of this accessory, struggling extremely during the shooting phases.
Another important aspect is not to forget some portion of the image. This can especially happen if your camera has few autofocus points. In these cases I highly recommend manual focus.
Start by focusing on the closest point of your subject and shoot. Then, with the focus ring, make a small rotation and shoot again. Continue like this until you focus on the extreme point of the subject, at the bottom.
Focus stacking is a very fun technique. With a little initial patience, you will be able to obtain surprising results (especially for those unfamiliar with this technique).
When you subscribe to the blog, we will send you an e-mail when there are new updates on the site so you wouldn't miss them.
About the author
By accepting you will be accessing a service provided by a third-party external to https://www.insightadv.it/


Comments