
Photograph in black and white.
Black and white photography has a unique and timeless appeal . His classic and minimalist style remains one of the most appreciated in photography. In this guide article we will discover together all the techniques and tricks to photograph fantastic black and white photographs.
What is black and white photography?
Absolute light and its total absence are the extremes of the palette of those approaching black and white photography. White is formed by the sum of all the colors of the electromagnetic spectrum. In color psychology, white is the color of purity, a symbol of the absolute. White gives a feeling of peace, light and positivity, but can generate opposite sensations such as silence, emptiness and coldness. Black represents the absence of color, when a body absorbs all the colors of the spectrum without reflecting any of them. Black is usually associated with negativity, fear, the unknown, but it's also an elegant color that conveys authority and confidence. Between these two opposites are different shades of gray (grayscale) which allow you to create captivating shades that simplify the reality of the world by making images interesting, nostalgic and pleasant.
History of black and white and color photography
The use of color or black and white photography depends not only on technical and professional standards, but also on aesthetic and cultural conventions, styles and preferences.
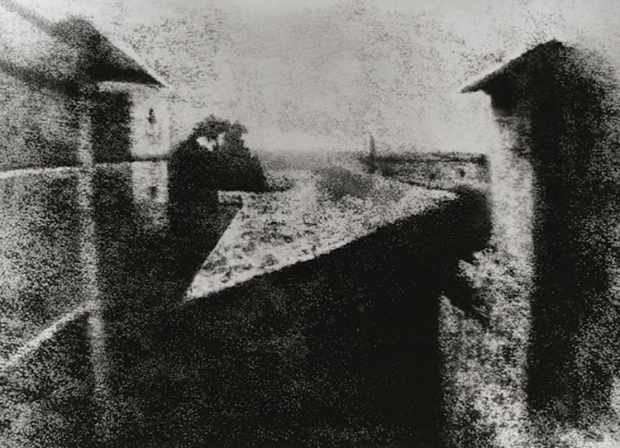
The photographic process was born in black and white . The first black and white photographic image is a 16.5 x 20.5 cm image made by Niépce between June 4 and July 18, 1827. The photo is entitled "View from the window of le Gras" (Point de vue du Gras – View from the Study Window at Maison du Gras).
Nowadays taking color photographs seems easy and obvious. However, the search for a simple and inexpensive way to photograph color has been long and difficult. Color photography only became practical after film manufacturers invented easier-to-develop processes. Kodak revolutionized color photography with the release of the now legendary Kodachrome in 1936, a color reversal film, which made it possible to capture highly detailed images in full, expressive, chromaticity and later with Ektachrome film in the 1940s. However, "serious" documentary and artistic photography remained for a long time the prerogative of black and white photos. Color photos were used in commercial and amateur photography. Only from the 1950s did some photographers such as Ernst Haas , Saul Leiter , Steven Shore , Joel Meyerowitz , Helen Levitt and William Eggleston begin to use color in the artistic and documentary fields. This passage from black and white to color also marked a passage to an increasingly poetic thrust of everyday life, a search for the hidden beauty in everyday life. Things have profoundly changed nowadays. Shooting in black and white today now involves a deliberate aesthetic decision to highlight the particularities of this process.
Learn from the great masters of black and white
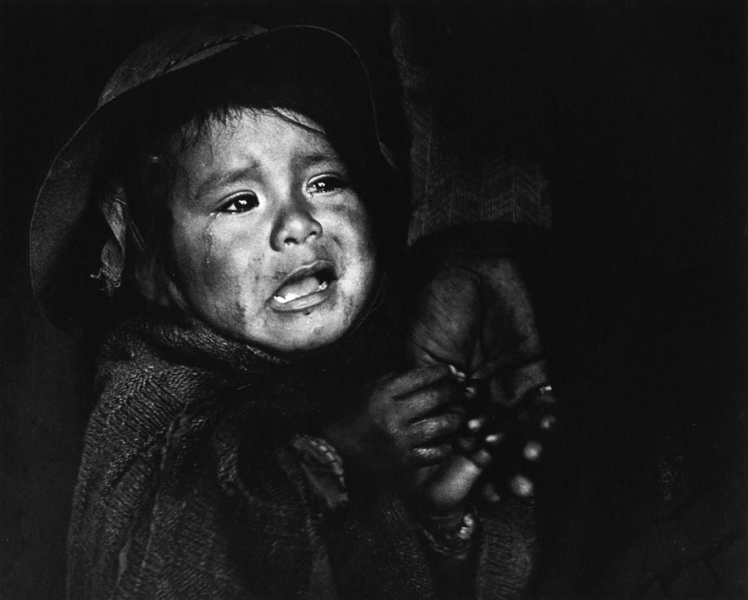
Before you start taking pictures, I advise you to look at the work of the great masters of photography who worked in black and white . Watching their work, you never stop learning. You can look at the extraordinary street photography of 1950s and 60s Hong Kong by Fan Ho , the poetic images of Pedro Raota , the famous black and white landscape photographs of Ansel Adams , the elegance of Jeanloup Sieff, the precision of Edward Weston, the experiments of Bill Brandt and the decisive moments of Henri Cartier-Bresson and many others.
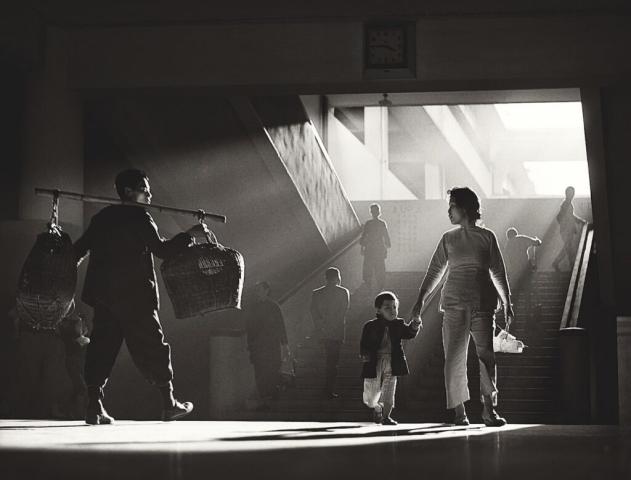 A photograph of Fan Ho
Images that work in black and white or color
Have you ever wondered why some photos work well in black and white and not in color or vice versa. Black and white images highlight certain elements that in color photography are overshadowed by color contrasts. For example, a photo of a green plant with red berries will have a lot of contrast in a color image, and will immediately catch our eye, but if we convert it to shades of gray, the same image will appear dull. The greens and reds will in fact become very similar gray tones, leaving the scene with little tonal contrast.
Learn to see in black and white
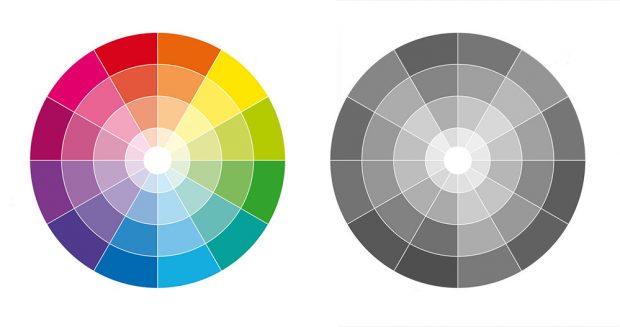
Simply converting a digital color photo to black and white or shooting with black and white film is not enough to get a good black and white photograph . If we want to take attractive black and white photographs, we need to think in terms of light and dark . We should train our eye to see the world around us in black and white , to dwell on the fundamental elements of monochrome photography and understand how to exploit the gray contrast in our favor. An important lesson is that colors of similar brightness (and those that are next to each other on the color wheel) will result in similar gray tones , making the photographed scene look flat.
Fundamentals of black and white photography
For many years, it was the norm to teach black and white photography first, then switch to color photography once the basics were mastered. It is a path that is valid even today, because it allows those approaching photography to understand the photographic elements. Let's see below the essential elements of a grayscale photo :
The composition
Composition is one of the most important aspects of good photography. The compositional choice consists in the arrangement of the visual elements within the frame of a photograph . In black and white photography, due to the absence of color, the emphasis of the composition will be greater.
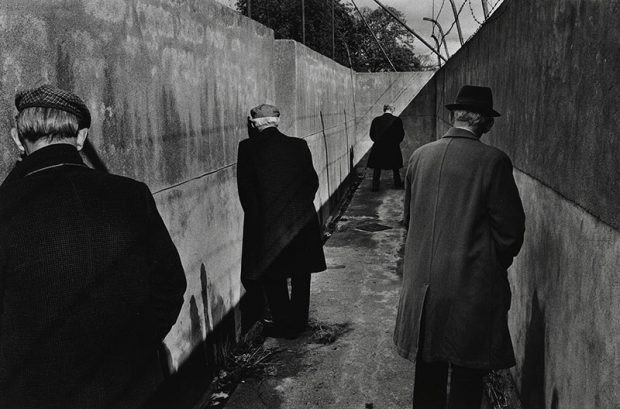 Photo by Josef Koudelka
The light
Light is the fundamental element of any type of photography . Any photo is born thanks to the light which, depending on its quality and directionality, outlines the shapes and volumes of the objects represented.
In black and white photography , however, lighting becomes more important as we don't have the visual information about color available. Lighting determines not only the brightness and darkness of an image, but also the tone and mood of the image.
Shadows
One of the first things to remember when shooting in black and white is that shadows have an essential impact. They are not only the darkest parts of a photograph, they are decisive elements in the choice of composition, and sometimes even the subject of the images itself. The shadows will be your allies to highlight the details of the composition . Shadows will also give you great contrast that will add character to your images and texture to your subject .
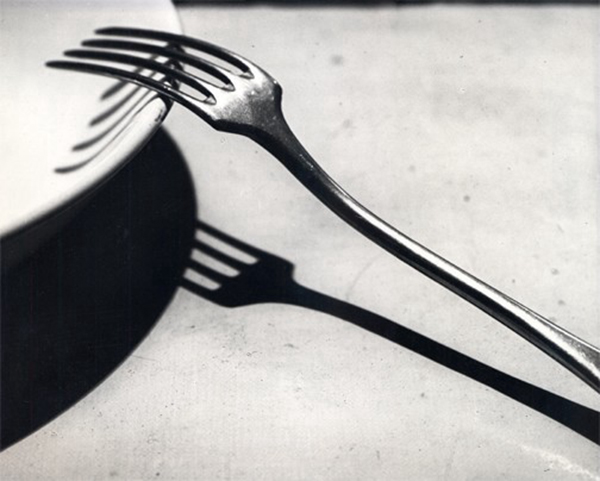 Photo by Andre Kertesz
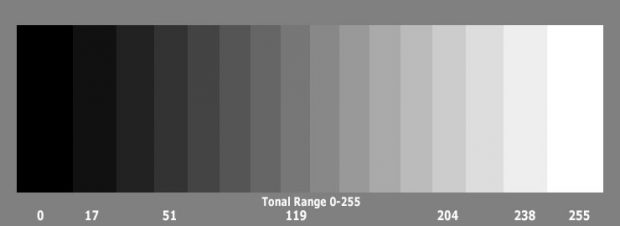
Contrast and tonal range
Contrast in an image is the ratio or difference between the highest value (i.e. the brightest point in the image) and the lowest value (i.e. the darkest point) of brightness in the image. The tonal range , on the other hand, indicates the extent of the gray scale represented in the image. Therefore we can have photos with a very wide tonal range with minimal contrast, as well as high-contrast photos that show a reduced tonal range. Tonal range and contrast provide very different sensations . The tonal range of a photograph helps convey greater depth, as if the image were made up of different layers. Conversely, a strong contrast conveys dynamism, strength and tension to the image.
Shapes and lines
The human eye naturally tends to be attracted to geometric elements. The lines and geometric shapes represent elements of strong attraction . They guide the viewer's eye through the composition and express different sensations depending on the shape and direction. In black and white these stand out even more thanks to the contrast between the light and dark areas. We must, therefore, pay particular attention in the pre-visualization of the shot during the compositional choice.
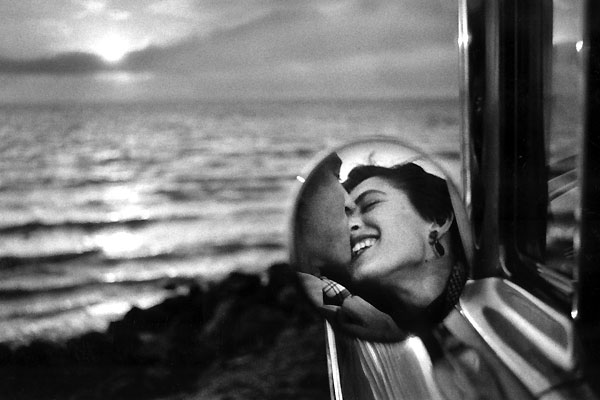 Photo by Elliott Erwitt
Textures and repetitions of elements
Textures can play an important role in black and white photography. When your images lack any color, textures help give the image body . The more interesting textures often include repeating shapes or lines that form a pattern. The repetition of similar shapes sets a certain rhythm to the image , making it easier to read. The repetitions become particularly effective when they are interrupted by an element that clashes with the scene.
Tone
In black and white photography, when we talk about tone we are referring to the overall brightness and darkness of the image . Images can have a normal tone or be Low Key or High Key . Choosing High Key, Low Key or “just” normal lighting has a big impact on the mood of the lighting. When we look at a high key image, we can see that the image is bright, because we need to set the exposure levels to high values. The other noticeable feature is the lack of contrast, as the tone is nearly uniform across the scene. A third feature is the smoothing of shadows. In Low Key images, however, we have a predominance of dark tones. Low key images are also distinguished by high contrast and strong shadows.
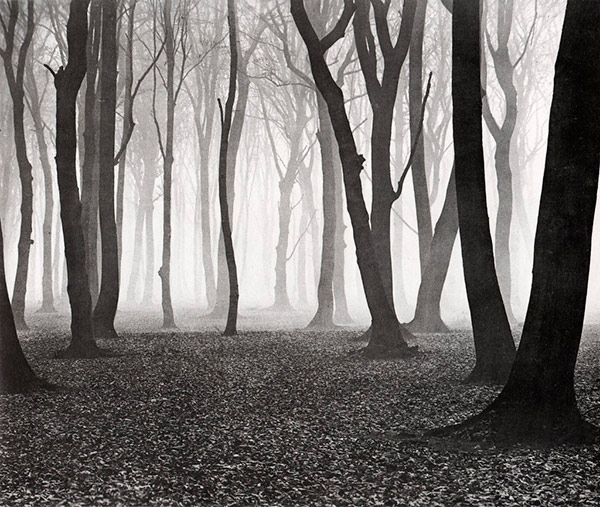 Photo by Albert Renger-Patzsch
Shoot in black or white or convert photos to color
Most cameras have a mode for shooting in black and white . Many, therefore, wonder whether to shoot in black and white it is better to photograph color photos and convert them in post-processing or use the camera's monochrome mode.
It's always best to take color photos and then convert those photos to black and white later in post-production, for several reasons. If you change your mind and want a color photo, you can always go back and change your choice. In addition, a color raw file allows for greater flexibility in post-production .
When we shoot in black and white from the camera we are applying a predefined color conversion algorithm chosen by the engineers who designed the camera software which decisively limits the obtained file. Different is the case with a camera designed only to shoot in black and white like the expensive Leica M Monochrom. In ordinary digital cameras a color filter is placed on each pixel in order to capture color information. Digital cameras that record directly in black and white, such as the Leica M Monochrom, do not have this filter and ensure greater sharpness , for a disproportionate price.
Shoot in Raw
RAW files have more information and image quality , while JPEGs are interpretations of algorithms processed inside the camera through the compression of some parameters. The Raw format, therefore, allows an incomparable richness of detail and enormous flexibility in managing the result. For the best possible conversion, start by shooting in RAW. Then, in your RAW converter software, boot the photo as a 16-bit file . 16-bit files have much more information to work with than 8-bit files, which allows for better conversion with smoother tonal gradations.
Black and white filters
Filters for black and white photography have long been a popular accessory for photographers and offer a number of different functions or effects. If you're shooting with black and white film, or a monochrome-only digital camera, it's important to use filters on the front of the lens to alter the contrast and tone in your images. In the case of digital photography we can simulate the effect of filters with post production programs. However, many still prefer to use the filters to see the effect directly in the camera.
Color filters for black and white photography serve to make the spectral transmission curve of photographic film similar to human vision. They also allow you to transform tonal contrast and enhance tonal separation within wavelengths. The most used filters to improve black and white photographs are yellow, orange, blue, red, polarized filters and GND filters.
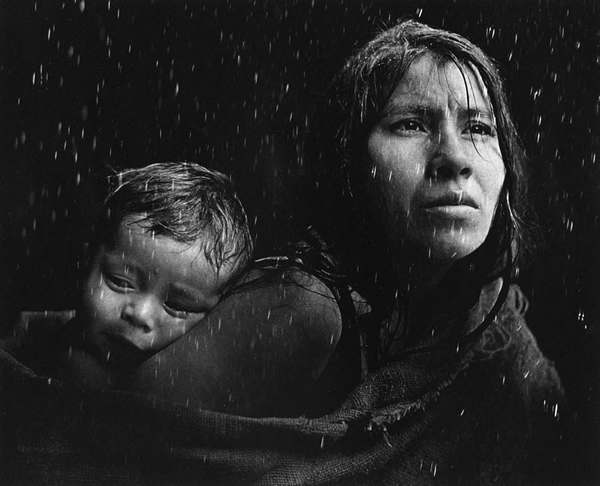 Photo by Pedro Luis Raota
How to convert image to black and white with software
Let's see how you can convert images to black and white using post-production software such as Lightroom, Photoshop and others.
How to make an image black and white in Lightroom
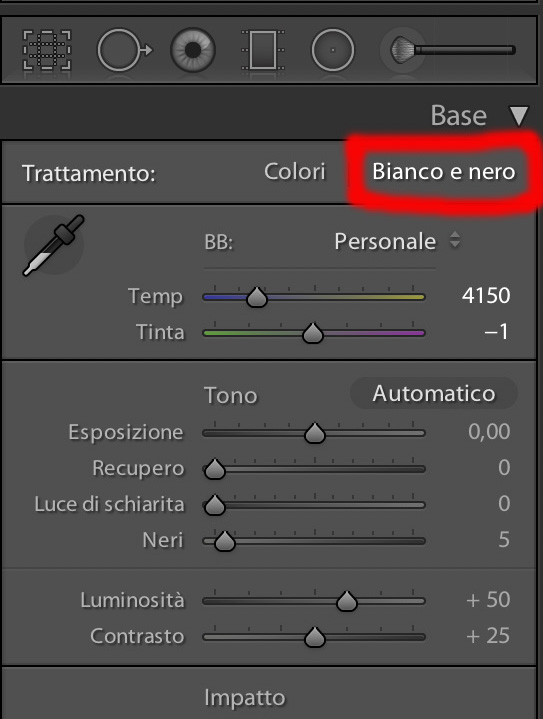
Using Lightroom to convert a color photo to black and white is very simple and fast. There are various ways to convert photos to black and white in Lightroom, but the easiest is to simply turn on the Black & White treatment at the top of the Basic panel, or just hit "v" on your keyboard.
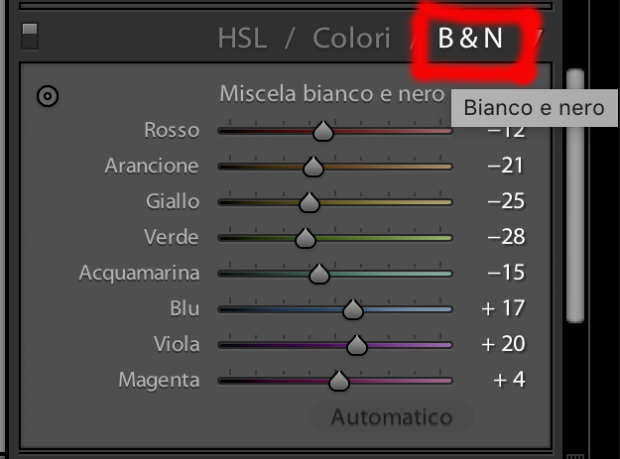
With Lightroom we can also control the tones of the image. In addition to the usual sliders of the Basic panel that allow us to adjust exposure, blacks, contrast, etc., we have available, in the B & W panel , the sliders of the Black and White Blend section.
By changing the values of the individual color sliders we can adjust the gray tones corresponding to the similar colors in the original photo. However, keep in mind that extreme settings often add high levels of noise and tend to muddy the tones .
Best Methods to Convert to Black and White in Photoshop
Destructive and non-destructive methods in Photoshop
Photoshop and Photoshop Elements offer both destructive and nondestructive black and white conversion techniques. Destructive methods are those that cannot be changed later. Once the conversion is done, the only way to change it is to undo the conversion and start over.
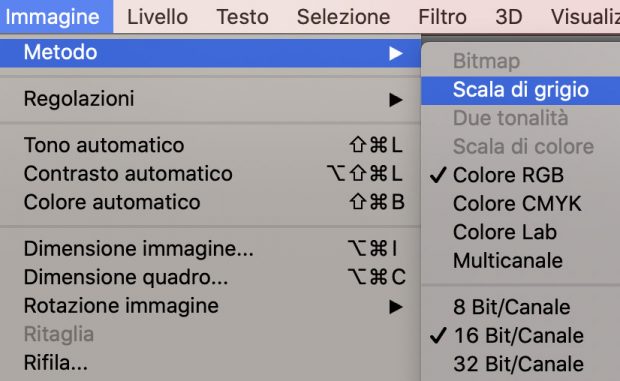
Convert to grayscale (destructive)
The simplest method of converting to black and white is converting to grayscale . However, this is a destructive methodology that leaves no control over the conversion.
Go to Image > Mode > Grayscale
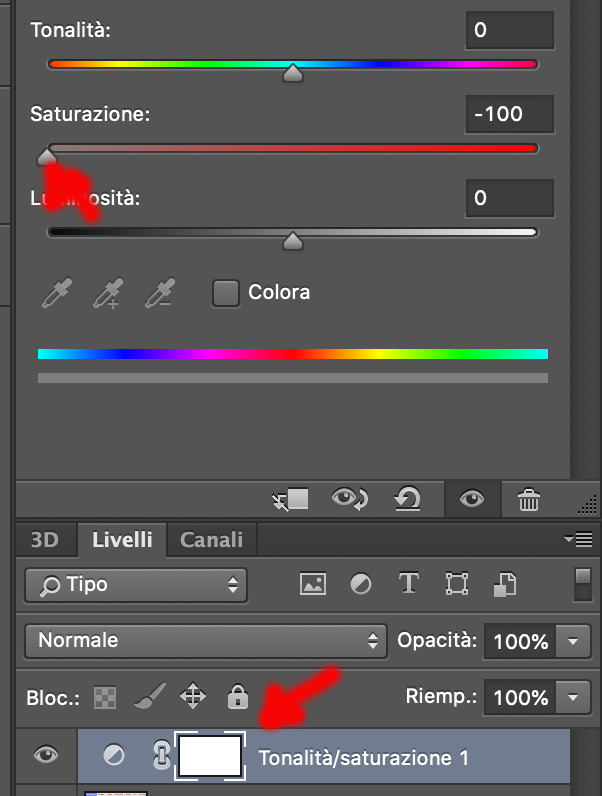
Use the Hue/Saturation tool (non-destructive)
This method of converting to black and white gives exactly the same result as converting to grayscale. It has the advantage of being available as an adjustment layer and allows it to be used as a non-destructive edit. However, it leaves no control over the conversion.
Layer > New Adjustment Layer > Hue/Saturation. Move the Saturation slider all the way to the left (-100).
Lab color mode (destructive)
This technique converts your photo from RGB color mode to Lab color mode . Lab mode records brightness and color values separately, which means that in Lab you can discard color information to leave a black and white image.
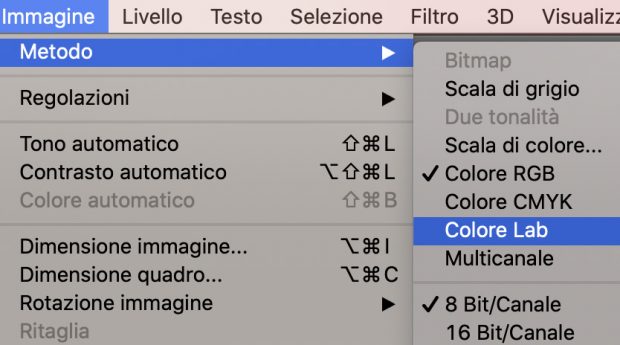
This method provides a black and white conversion that is more mathematically accurate. However, it is a destructive editing process, which does not give much control. Go to Image > Mode > Lab Color. Go to the Channels window if it's already open (otherwise go to Window > Channel) and select the Luminosity channel. Bring the Layers Palette to the foreground and make the Background Layer active. With the key combination Ctrl+J we duplicate the Background Layer. At this point personal taste comes into play: if the image seems too dark, change the blending mode of the duplicate layer from Normal to Screen; on the contrary if it seems too light, from Normal to Multiply.
Gradient Map (non-destructive)
The Gradient Map tool affects the brightness values of the photo. Dark areas become black or dark gray, and light areas are highlighted in white or light gray.
Converting to black and white is non-destructive, quick and easy. However, we have no control over the result of the conversion. Press "D" to reset the foreground and background colors to black and white. Layer > New Adjustment Layer > Gradient Map
Channel mixer (non-destructive)
The channel mixer in Photoshop mixes color channels. Color photos have three color channels: red, green, and blue. These primary colors combine to create millions of colors in your photo. The Channel Mixer conversion method allows you to adjust the ratios between the red, green and blue channels .
It opens from Layer > New Adjustment Layer > Channel Mixer. Check the Monochrome box. Move the Red, Green and Blue sliders left and right to lighten and darken different tones in the photo. The total of the three sliders should always be 100%.
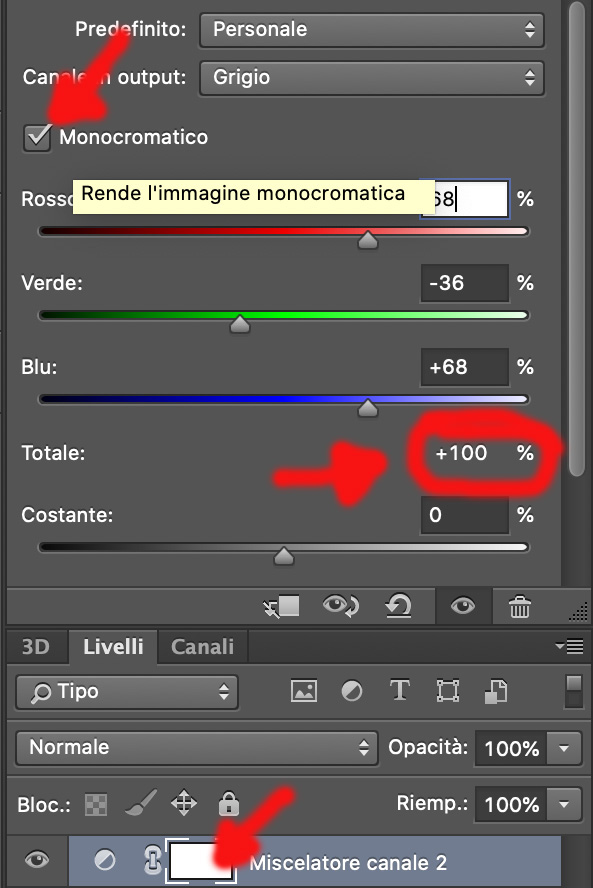
When we lighten a channel value with the mixer, we are lightening the colors that are close to it on the color wheel and darkening the colors that are opposite it. Increasing the value of the red channel, for example, will make the red tones in the photo lighter and the blue tones darker. The channel mixer reproduces the effect of color filters in analog photography . For example, if we set the brightness of the red channel to 100%, we can get the same effect as using a red filter on the lens with black and white film.
Black and White Adjustment Layer Method (Non-Destructive)
Available from Photoshop CS3 onwards, the Black & White Adjustment Layer provides a mixer control that allows you to adjust the gray tones of specific colors in the image. But the coolest feature is its targeted adjustment tool. With this tool you can adjust the tones of your photo to make them lighter or darker. It is an intuitive and precise conversion technique. To open the black and white adjustment layer: Choose Layer > New Adjustment Layer > Black and White .
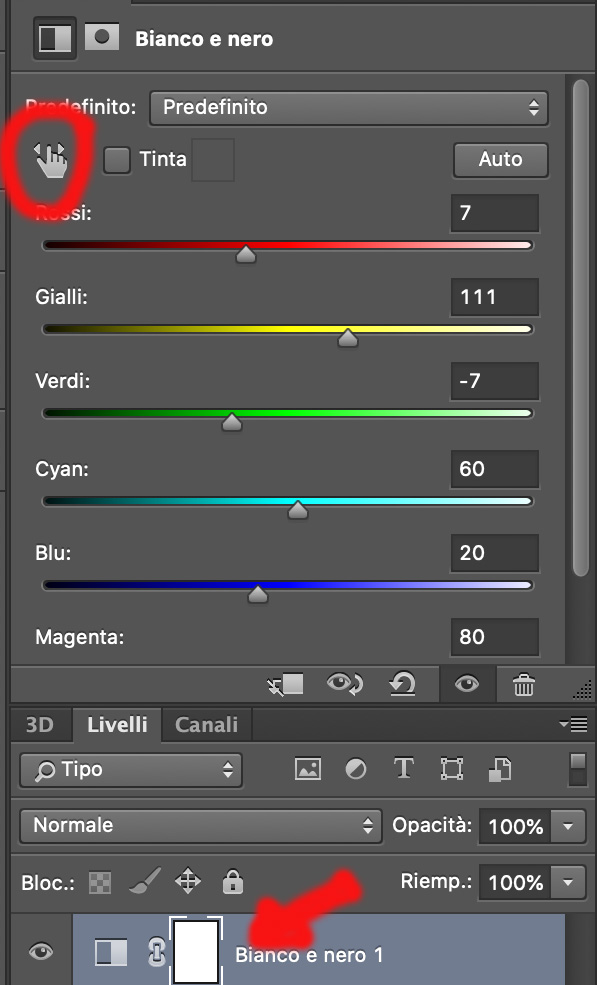
To adjust colors directly on the canvas, use the In-Image Adjustment tool (  ). Click on the image and drag to the left (darken) or right (lighten). However, it must be kept in mind that extreme settings tend to muddy the gray tones of the image.
Black and white conversion using calculations
This is one of the most powerful tools for black and white conversion. You need to be familiar with blending modes in Photoshop to work with calculations. What Calculations does is take any two of the three (RGB) channels and mask one with the other using the selected blending mode. Go to Image>Calculations . A window will open that allows you to choose the two channels to blend with the color blending mode you prefer. For color channels we have the three brightness channels Red Green and Blue which are part of the RGB image. This method allows you to use several parameters. In addition to the possibility of mixing the two different channels (choice between Red, Green and Blue), we can in fact choose the blending method between the two channels and the opacity.
Selective correction with curves and levels
After converting the file to black and white , we can take advantage of photoshop levels to act selectively on our image, through curve and level adjustments.
Photo parts adjustments are a must to make a great black and white photo . For example, we may want to make the sky darker or our subject brighter.
Convert to black and white in Adobe Camera Raw
The last method involves converting the image to black and white in the Raw file processing stage . Because you're working with a raw file, no matter what changes you make, the information about the file will remain unaltered, making this technique completely non-destructive . It also lets you access the rest of the tools available in Raw processing.
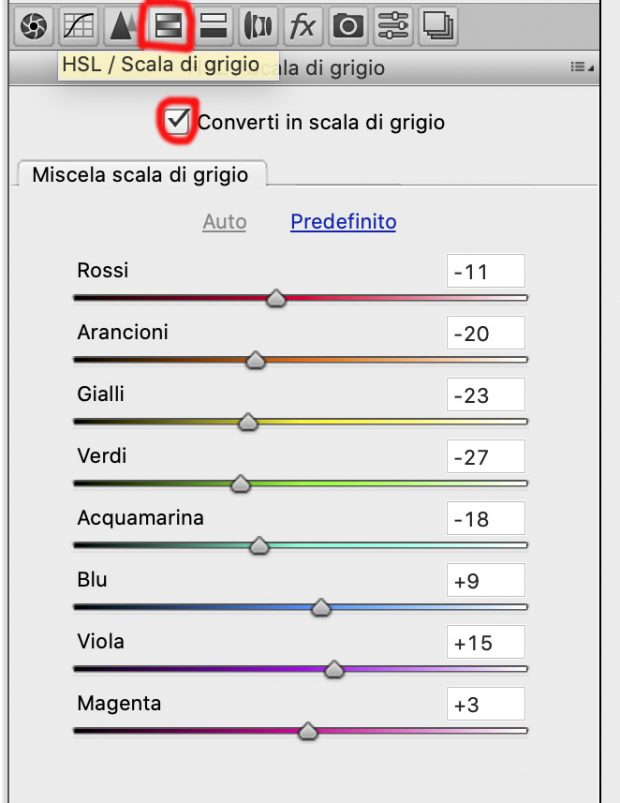
To get started, open your image in Adobe Camera Raw by opening your Raw file with Photoshop. On the right toolbar, you should see a row of icons. Find the one called HSL/Grayscale and click on it. From here, you have access to a set of sliders that act the same as a black and white adjustment layer in Photoshop .
Plug in for professional black and white
We can also use dedicated plug-ins to obtain a good black and white. Silver Efex Pro is the most advanced black and white photo plug-in. With its algorithms and set of tools and adjustments for tweaking brightness, contrast and boosting whites, you get good control in post-production. Silver Efex Pro's advanced Grain Engine also reproduces the classic grain of black and white film.
Why shoot in black and white film
Using a digital camera to take black and white photos has many benefits, such as ease of editing and the ability to instantly review your shots . However, there are several reasons why we might prefer to shoot on film .
– Greater dynamic range : Films easily pick up more dynamic range than black and white digital camera sensors, offering a greater variation of tones between light and dark , especially in high contrast situations .
– Film grain : Although we can try to imitate film grain with post production software, the effect will never be the same as that obtained from analog film.
When you subscribe to the blog, we will send you an e-mail when there are new updates on the site so you wouldn't miss them.
About the author
By accepting you will be accessing a service provided by a third-party external to https://www.insightadv.it/


Comments